What’s this about?
This site is an official rules reference for Red Rising by Stonemaier Games.
It’s great for finding a specific rule quickly. It's also an excellent supplement to the rulebook included in the box, when watching a how-to-play video, or while teaching the game.
Usage Tips
Back & Forward Nav: Think of each rule entry as a separate webpage. If you want to jump back, hit your Back button.
Check the Index : Don’t see what you’re looking for? It's probably in the index.
Install it: This site is a (Progressive Web App). You can install it as a standalone app that is lightning fast, and works even when you're offline.
Link to a rule: Want to share a link to a particular rule? Just click its title!
Credits
Designed by Jamey Stegmaier and Alexander Schmidt
Art by Jacqui Davis, Miles Bensky, and Justin Wong
Based on the novels by Pierce Brown
©2014 Pierce Brown, Inc. All Rights Reserved. Tabletop rights reserved by Stonemaier Games.
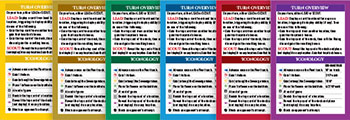
Turn Overview
On your turn, either lead or scout.
Lead: Deploy a card from hand face up on a location, triggering its deploy ability (if any). Then do one of the following:
Gain the top card from another location, then gain that location’s bonus.
Gain the top card of the deck, then roll the Rising die and gain the resulting bonus.
Scout: Reveal the top card of the deck and place (not deploy) it on any location. Gain that location’s bonus.
Iconology
| End-Game VP | ||
|---|---|---|
| Jupiter. Advance once on the Fleet track. | VP on track | |
| Mars. Gain 1 Helium. | 3 VP each | |
| Luna. Gain (or keep) the Sovereign token. | 10 VP | |
| The Institute. Place 1 Influence on the Institute. | 4/2/1 VP each | |
| End-of-game scoring ability | ||
| Banish the top card of a location. | ||
| Reveal the top card of the deck and place (not deploy) it on any location. | ||
| Block an opponent's attempt. | ||
Characters
 4D Painter
 Administrator
 Aegis Craftsman
 Aja
Aja Alfrun
 Alia Snowsparrow
 Antonia
 Arlus
Arlus Artificer
 Artisan Chef
 Ash Lord
 Assassin
 Auctioneer
 Banker
 Bondilus
 Boneriders
 Bridge
 Calliope
 Cassius
 Ceo
Ceo Codebreaker
 Colonel Valentin
 Conversationalist
 Cyther
 Dancer
 Danto
Danto Darrow
 Dataport Specialist
 Deanna
 Developer
 Diplomat
 Dr. Virany
 Eo
Eo Evey
Evey Firewall Expert
 Fitchner
 Garden Trained Rose
 Gardener
 Gravboot Cobbler
 Group Counselor
 Hacker
 Harmony
 Helga
Helga Holiday
 Holo Designer
 Holo Host
 Hypnotist
 Investor
 Invictus
 Janitor
 Jopho
Jopho Judge
Judge Justice
 Karnus
 Lawyer
 Loan Shark
 Lorn
Lorn Lysander
 Magistrate
 Martyr
 Masseuse
 Matteo
 Mess Hall Cook
 Mickey the Carver
 Modjob
 Morning Star
 Musician
 Mustang
 Nanny
Nanny Nero
Nero Octavia
 Online Gambler
 Orator
 Orion
Orion Pathologist
 Pax au Telemanus
 Pelus
Pelus Politician
 Priestess
 Psychologist
 Pulse Armorer
 Pulse Fist Engineer
 Quicksilver
 Quietus
 Ragnar
 Razor Designer
 Reporter
 Researcher
 Romulus
 Roque
Roque Seer
Seer Sefi
Sefi Sevro
Sevro Sponsor
 Stained
 Stock Broker
 Sun-Hwa
 Surgeon
 Tactus
 The Howlers
 The Jackal
 The Pax
 The Telemanuses
 Theodora
 Timony
 Trigg
Trigg Ugly Dan
 Uncle Narol
 Victra
 Virga
Virga Vlogger
 Zanzibar
End of Game
The game ends when all 3 of these conditions are met by any player or any 2 conditions are met by the same player:
- a player has 7 or more Helium
- a player has 7 or more Influence on the Institute
- a player reaches 7 or more on the Fleet Track
Finish taking turns until each player has taken the same number of turns in the game. If Apollo is an active house, they take the last turn (this is an extra turn).
During end-game scoring, for each card in your hand beyond the 7th card, you lose 10 VP.
Components
-
60 Helium tokens (red gems)

-
60 Influence tokens
(10 tokens in 6 different colors) -
6 Fleet tokens
(1 ship in 6 different colors) -
1 first-player token
(crescent moon) -
1 Sovereign token

-
112 character cards

-
6 house tiles
-
1 game board
-
1 scorepad
-
1 custom Rising die
-
6 reference cards
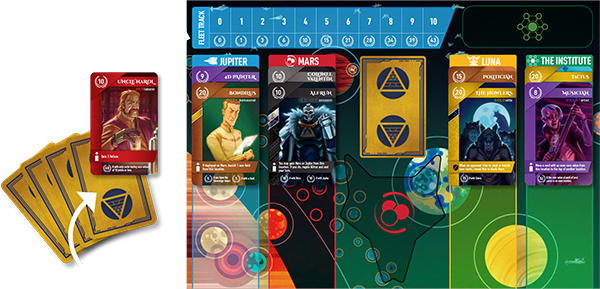
Setup
Shuffle the deck and place it on the board, along with the Rising die. Place 2 face-up cards on each location.
Draw 5 cards. Then gain a random house tile and the corresponding 10 Influence tokens. Place your Fleet token on the 0 space of the Fleet Track.
Anatomy of a Character Card
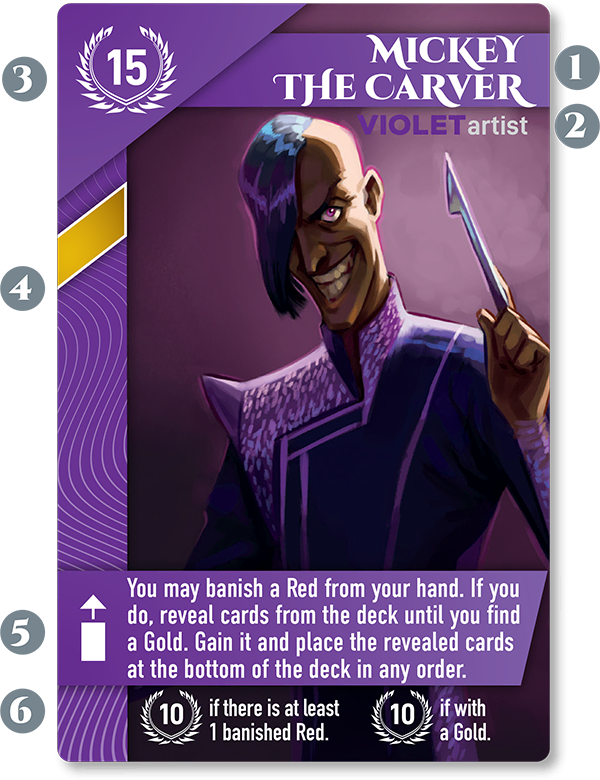

Name
Color. The color of a character card represents the caste of the character.
Core value (end-game points)
Characters this card wants (solid) and doesn’t want (X) in hand. This is a visual reference for text elsewhere on the card.
Deploy ability ().
End-game bonuses and points (). If a card refers to colors or specific characters (e.g., “if with a Red,” “if with no Blues,” “for each Gold”), it’s referring to the other cards in your hand.
Block ability (). This is an optional ability that requires you to reveal a card to prevent an opponent’s attempt to do something to you.
End-of-game ability ().
Colors
The color-based societal structure of the dystopian Red Rising world is an allegory for the racial struggles of the past and present in the real world. It’s a cautionary tale of what can happen when people are judged by the color of their skin instead of the content of their character.
Banish a Card
To banish a card means to remove it from the game (for now). There is an area near the board for banished cards (all face up and visible to players). Banished cards are in no particular order.
Block Ability
This is an optional ability that requires you to reveal a card to prevent an opponent’s attempt to do something to you.
The Deck
The deck is not a location, but if you choose to draw a card from the deck instead of one of the four locations during the lead action, you roll the Rising die, which grants you a mandatory bonus.
Deploy Abilities
The deploy abilities of some cards instruct you to “end your turn.” This indicates that you may not proceed to gain the top card of a location or the deck and the corresponding bonus.
The deploy abilities of some cards may move the card you’ve deployed to a different location. You are still considered to have deployed to the original location.
Some deploy abilities mention “another location,” referring to any other location than the one on which the card was deployed.
The deploy ability of some cards may instruct you to deploy another card. As usual, deploy that card face up on any location and trigger its deploy ability (if any). This concludes the deployment. You may still perform the final step of the lead action only once.
If it’s not possible for you to use the deploy ability of a card, you may still deploy it and ignore the ability.
If a card instructs you to move or place a card, it does not count as a deploy.
Deploy actions that result in a trade of resources may only be taken once per turn (e.g., Sponsor, Stock Broker).
Game End
The end of the game is triggered when all 3 of these conditions are met by any combination of players or when any 2 conditions are met by the same player:
 A player has 7+ Helium tokens
 A player has 7+ Influence on the Institute
 A player reaches or surpasses 7 on the Fleet Track
Finish taking turns until each player has taken the same number of turns in the game. If Apollo is an active house, they take the last turn (this is an extra turn). Then proceed to scoring.
Your Hand
You start the game with a hand of 5 cards. Your hand of cards is kept private throughout the game.
During scoring you lose 10 points for each card in your hand beyond the 7th card.
There is no hand limit.
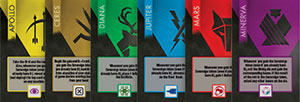
House Tiles and the Sovereign Token
Each house tile has an ability that is triggered whenever you gain the Sovereign token (even if you already have it). Typically this will happen by gaining a card from Luna, but it also applies to any card ability from which you would gain the Sovereign token, as well as rolling Luna on the Rising die. First gain the Sovereign token, then trigger the ability. These house abilities are mandatory, not optional.
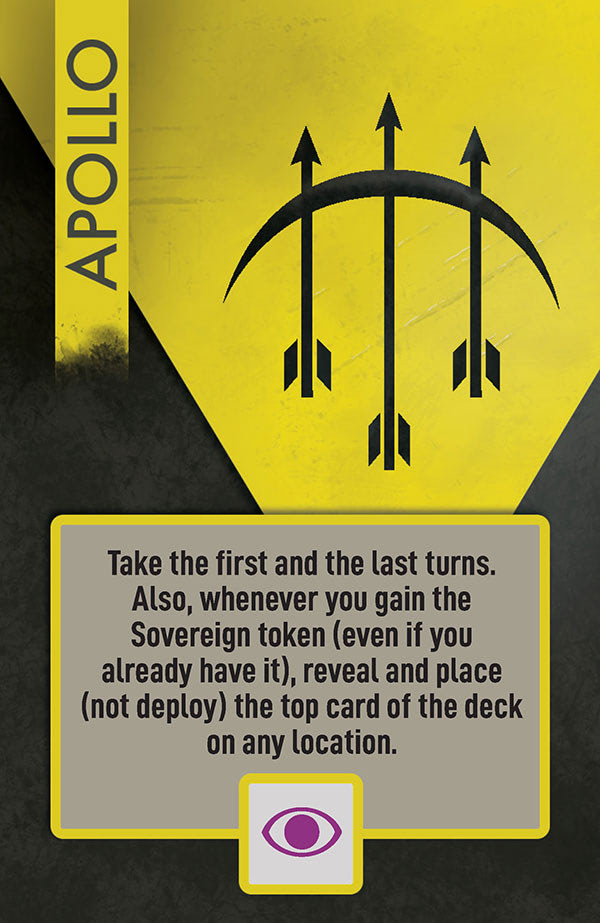

Apollo
-
Take the first and the last turns. Also, whenever you gain the Sovereign token (even if you already have it), reveal and place (not deploy) the top card of the deck on any location.
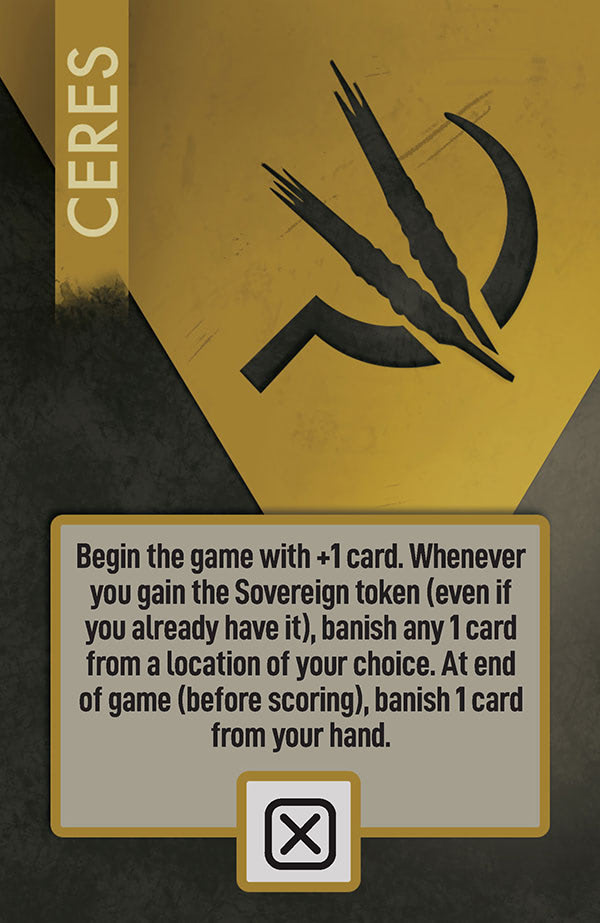
Ceres
-
Begin the game with +1 card. Whenever you gain the Sovereign token (even if you already have it), banish any 1 card from a location of your choice. At end of game (before scoring), banish 1 card from your hand.
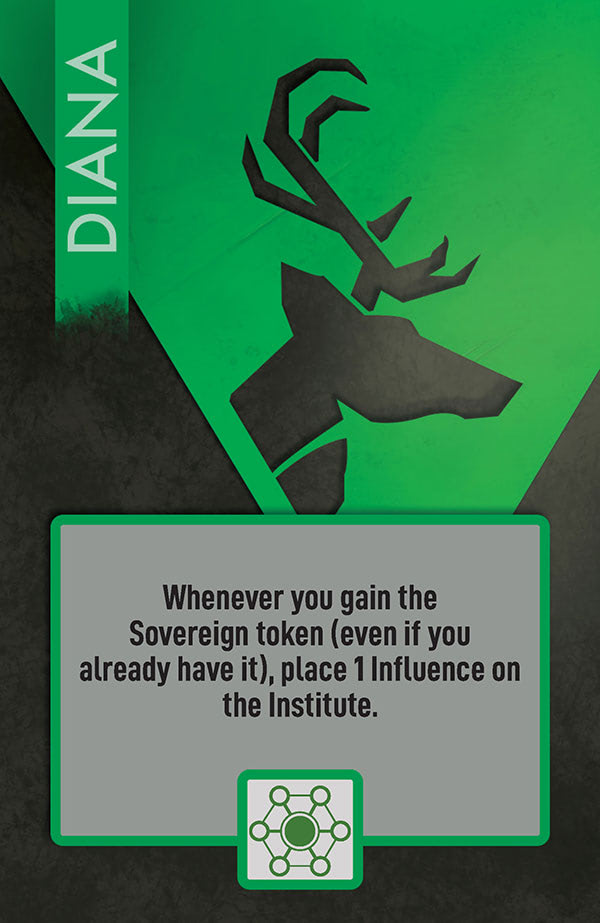
Diana
-
Whenever you gain the Sovereign token (even if you already have it), place 1 Influence on the Institute.
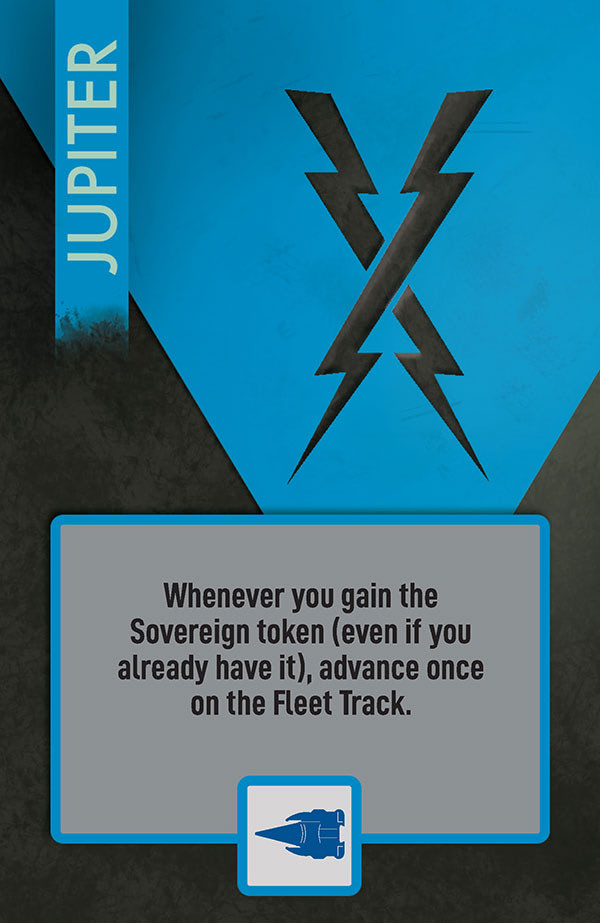
Jupiter
-
Whenever you gain the Sovereign token (even if you already have it), advance once on the Fleet Track.
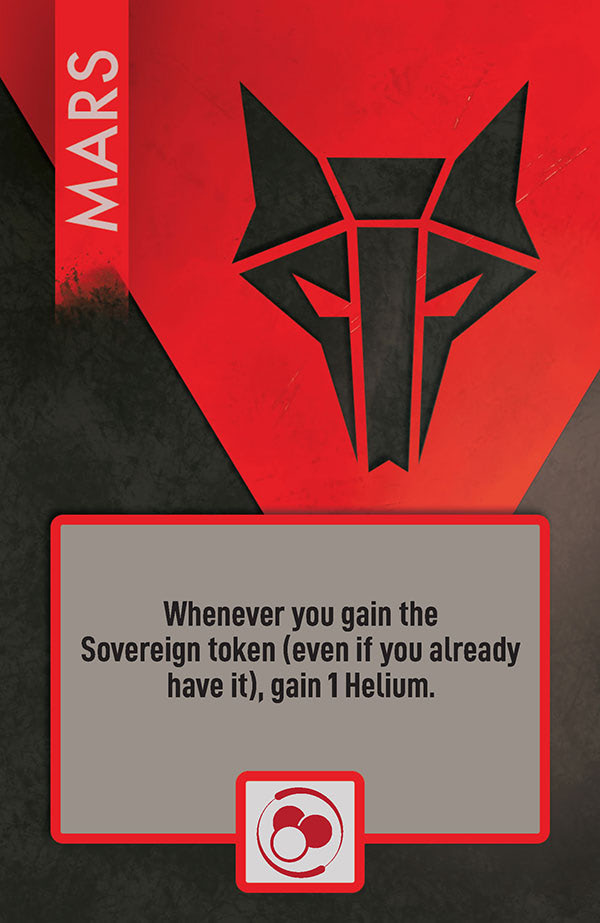
Mars
-
Whenever you gain the Sovereign token (even if you already have it), gain 1 Helium.
Minerva
-
Whenever you gain the Sovereign token (even if you already have it), roll the Rising die and gain the corresponding bonus. If the result of the roll is the Sovereign token, select any other bonus on the die.
Lead Action
On your turn, either lead or scout. When you lead:
Select a card from your hand.
-
deploy it face up on any location, covering all but the name, color, and core value of the topmost card at that location.
If possible, trigger the deploy ability () of the card played, unless it gives you the option not to (e.g., “You may gain…”).
Then, either:
Gain the top card of a location that you did not deploy to this turn, then gain that location’s bonus.
Gain the top card of the deck, then roll the Rising die and gain the resulting bonus.
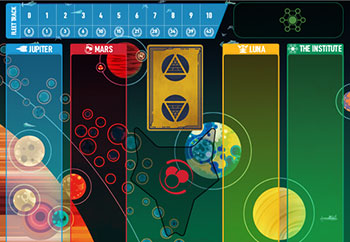
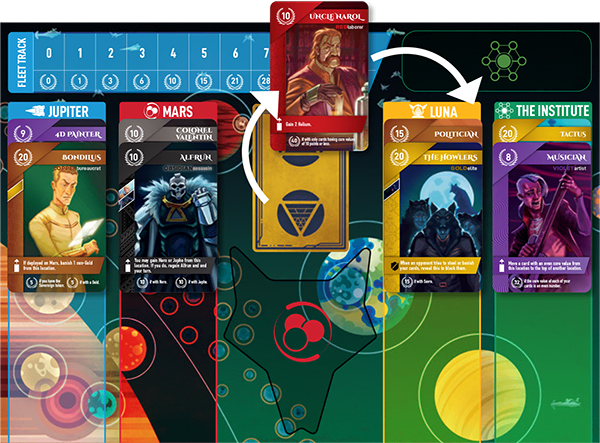
Locations
The 4 locations in the game are Jupiter, Mars, Luna, and The Institute. The deck is not a location.
After you gain a card from 1 of the 4 locations during the lead action or place a card from the deck on a location during the scout action, you must also gain that location’s bonus (if possible):
Jupiter
Advance once on the Fleet Track. If you have reached the end of the Fleet Track, you may not advance further.
Mars
Gain 1 Helium token. There is no limit to Helium tokens. If the supply is empty, use a suitable replacement.
Luna
Gain (or keep) the Sovereign token. This triggers the ability on your house tile.
The Institute
 Place 1 of your Influence tokens on this space. If you’ve already placed all 10 of your tokens, you can’t place more.
Reveal
To reveal a card means to show it to all opponents. Unless otherwise instructed, the card returns to your hand.
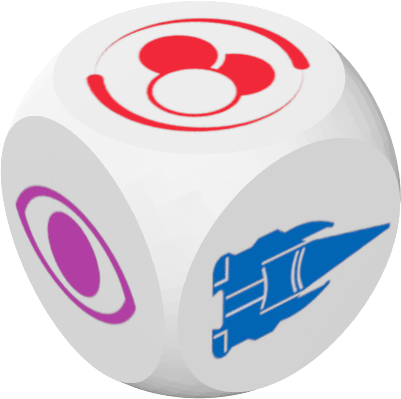
Rising Die
- Banish the top card of a location of your choice.
- Reveal the top card of the deck and place (not deploy) it on any location.
- Gain (or keep) the Sovereign token. This triggers the ability on your house tile.
- Gain 1 Helium token. If the supply is empty, use a suitable replacement.
- Advance once on the Fleet Track.
- Place 1 Influence on The Institute. If you’ve already placed all 10 of your tokens, you can’t place more.
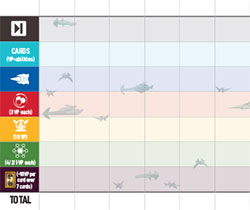
Scoring
Use the scorepad to tally each player’s score step by step in this order:
End-of-game abilities
Starting with the first player, trigger all of your end-of-game abilities in an order of your choosing. Continue clockwise with the next player until all players have triggered these abilities.
“You may treat this card as if its name alone is the same as a specific character.”
This text, seen on Orange cards, lets you change the name of the card to another character’s name. So if you have a card that scores points if it’s with Darrow, but you don’t have Darrow, you can rename an Orange card “Darrow” to score those points. Otherwise, all other aspects of the Orange card stay the same (i.e., you don’t also copy the Darrow character card’s points and ability). You do not score extra points for having multiple cards with the same name.
“You may treat this card as if it is any one other color (in addition to Gray).”

This text, seen on Gray cards, lets you treat each Gray card as an additional color (i.e., to score more points if a card needs or values another color).
Character Cards
Look at the cards in your hand. Add together the core value of each card (upper left) and points gained or lost from end-game bonus points (bottom).
“for each”
This scores points for each card in hand of the listed types.
“if with”/“if with no”

This scores points if you do or don’t have a certain card type or character in hand. It’s a binary condition—if it says “14 points if with a Silver,” you score 14 points total if you have one or more Silvers.
“for each [color] on all locations”
Unlike most end-game scoring, these end-game bonuses look at cards remaining on locations on the board, not cards in your hand.
“banished cards”

A few end-game bonuses refer to the pile of cards that were banished during the game. It doesn’t matter which player banished these cards.
Fleet Track
Score points based on your position on the Fleet Track (0–43 points).

Helium

Gain 3 points per Helium token.
Sovereignty
Gain 10 points if you have the Sovereign token.
Influence
The player(s) with the most Influence at the Institute gain 4 points for each of their Influence there. The player(s) with the second most Influence at the Institute gain 2 points per Influence. All other players gain 1 point per Influence.
- Note that in a 2-player game, 3 non-player Influence tokens start on the Institute. The 2 players will include those 3 tokens in the end-game comparison as if they were the Influence of a third house.
Excess cards
For each card in your hand beyond the 7th card, lose 10 points. At this time you’ve already accounted for other points from these cards—those points are still valid. This penalty represents the unwieldiness of managing a larger house and encourages players to focus on cards that work well together, not simply more cards.
The player with the highest score wins the game! A great final score is 300+ points.
If there is a tie for first place, the tied player with the Sovereign token wins.
If no tied player has the Sovereign token, share the victory.
Scout Action
On your turn, either lead or scout. When you Scout:
Place (not deploy) it on any location, covering all but the name, color, and core value of the topmost card at that location.
Gain that location’s bonus.
Players typically only choose to Scout if they are completely satisfied with their hand.
Setup Details

Place the board on the table. Shuffle the deck of character cards and place it face down on the board. Place the Rising die next to the deck.
On each location (Jupiter, Mars, Luna, and The Institute), place 2 character cards from the deck face up. These cards overlap so only the VP, name, and color of the covered cards are exposed. (Note: Players may look at cards on locations at any time.)
Draw 5 character cards from the deck to form your starting hand. Your hand of cards is kept private throughout the game. Next, gain a random house tile. Gain the reference card, Fleet token, and Influence tokens of the matching color. Then set up the rest of the board as indicated here:
Place your house’s Fleet token on the 0 space on the Fleet Track.
Place all Helium tokens in the designated spot below the deck to create the supply.
Place the Sovereign token nearby. This represents the leader of the Society.
Start with your house’s 10 Influence tokens in your personal supply (you’ll try to place them on the Institute during the game).
For 2-player games, place 3 influence tokens of an unused house into The Institute. This represents a neutral house, making end-game scoring more competitive.
If a player has House Apollo (yellow), give them the first-player token; otherwise, randomly select a player and give them the first-player token. They can proceed to take their first turn. The first-player token will remain in that player’s possession throughout the game.
9 4D Painter Violet artist
- Move a card from this location to the top of another location where there are no cards with the same color as it.
End of Game
- 31
- if each of your cards is a different color.
15 Administrator Copper bureaucrat
- If deployed on the Institute, reveal the top 2 cards of the deck and place them under this card in any order.
End of Game
- 15
- if you have the least Influence on the Institute (or tied for the least).
15 Aegis Craftsman Orange engineer
- You may gain a Gold from this location. If you do, end your turn.
End of Game
- You may treat this card as having the same name as any specific character.
- 10
- if with a Gold.
- 10
- if with no Obsidians.
15 Aja Gold elite
- Choose an opponent; they banish 1 of their cards. Then banish Aja.
End of Game
- 15
- if with Octavia.
10 Alfrun Obsidian assassin
- You may gain Nero or Jopho from this location. If you do, regain Alfrun and end your turn.
End of Game
- 10
- if with Nero.
- 10
- if with Jopho.
16 Alia Snowsparrow Obsidian assassin
- Banish the top non-Gold card from any other location. If it’s not Gray or Obsidian, gain 1 Helium.
End of Game
- 24
- if only with Golds, Grays, and/or Obsidians.
15 Antonia Gold elite
- Choose an opponent. They banish 1 of their cards. Then, banish Antonia.
End of Game
- 15
- if with The Jackal or 2 other Golds.
- −10
- if with Victra or Sevro.
10 Arlus Red laborer
- Each neighboring player reveals a random card from their hand. If it is Gold, banish that card. If it is Red, banish Arlus.
End of Game
- 25
- if with no Golds.
10 Artificer Orange engineer
- You may gain a Gold or any other Orange from this location. If you do, end your turn.
End of Game
- You may treat this card as having the same name as any specific character.
- 20
- if with both another Orange and a Gold.
10 Artisan Chef Brown assistant
- If deployed directly on top of a Gold, move that Gold to the top of another location and place 1 Infuence on the Institute.
End of Game
- 5
- for each Gold.
- Ignore any lost points from Golds.
25 Ash Lord Gold elite
- Banish all Blues from this location. If this banishes 2 or more Blues, regain Ash Lord.
End of Game
- 5
- for each Blue.
- 5
- for each banished Blue.
5 Assassin Brown assistant
- Banish the card directly under this one. If it’s a Gold, place 1 Influence on the Institute.
End of Game
- 10
- for each Obsidian.
12 Auctioneer Copper bureaucrat
- Choose an opponent. That opponent chooses one: Gain 1 Helium, advance on the Fleet Track, or place 1 Influence on the Institute. You gain both other options.
End of Game
- Gain 1 Helium, advance once on the Fleet Track, or place 1 Influence on the Institute.
10 Banker Silver financier
- You may pay 3 Helium to gain any card from this location. If you do, banish Banker.
End of Game
- You may pay 3 Helium to gain the top card of any location.
20 Bondilus Copper bureaucrat
- If deployed on Mars, banish 1 non-Gold from this location.
End of Game
- 5
- if you have the Sovereign token.
- 5
- if with a Gold.
15 Boneriders Gold elite
- Gain the Sovereign token.
End of Game
- 15
- if with The Jackal or a Gray.
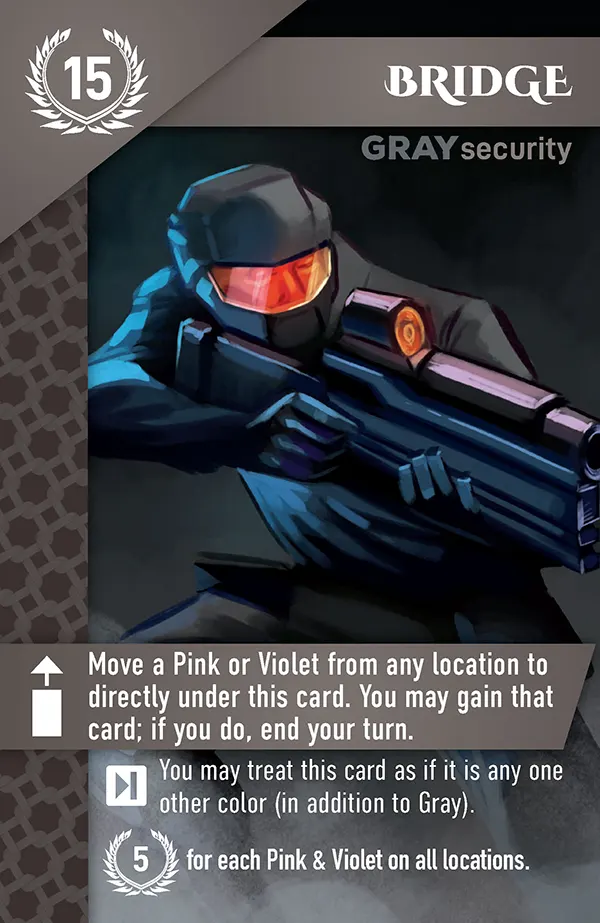
15 Bridge Gray security
- Move a Pink or Violet from any location to directly under this card. You may gain that card; if you do, end your turn.
End of Game
- You may treat this card as if it is any one other color (in addition to Gray).
- 5
- for each Pink & Violet on all locations.
15 Calliope Pink companion
- Reveal the top card of the deck, then deploy it face-up on another location.
End of Game
- 20
- if with The Jackal.
25 Cassius Gold elite
- Gain the card directly under this one. Banish Cassius unless that card is a Gold.
End of Game
- 40
- if with both Mustang & Darrow.
- −20
- if with Darrow (but not Mustang).
12 Ceo Silver financier
- You may regress once on the Fleet Track. If you do, gain 2 Helium.
End of Game
- 18
- if you have at least 5 Helium.
8 Codebreaker Green programmer
- Reveal the bottom card of the deck. If it's a Gold or Silver, leave it there; otherwise gain it. Banish Codebreaker unless you deployed it on top of a Gold or Silver.
End of Game
- 22
- if the first letter of the names of your cards are all different.
10 Colonel Valentin Gray security
- Move a Gold from any location to directly under this card. You may gain that card; if you do, end your turn.
End of Game
- You may treat this card as if it is any one other color (in addition to Gray).
- 5
- for each Gold on all locations.
15 Conversationalist Pink companion
- Move the top card from another location to under this card. If it’s a White, gain it.
End of Game
- 15
- if with a White.
14 Cyther Orange engineer
- You may gain a Blue from this location. If you do, end your turn.
End of Game
- You may treat this card as having the same name as any specific character.
- 16
- if with a Blue.
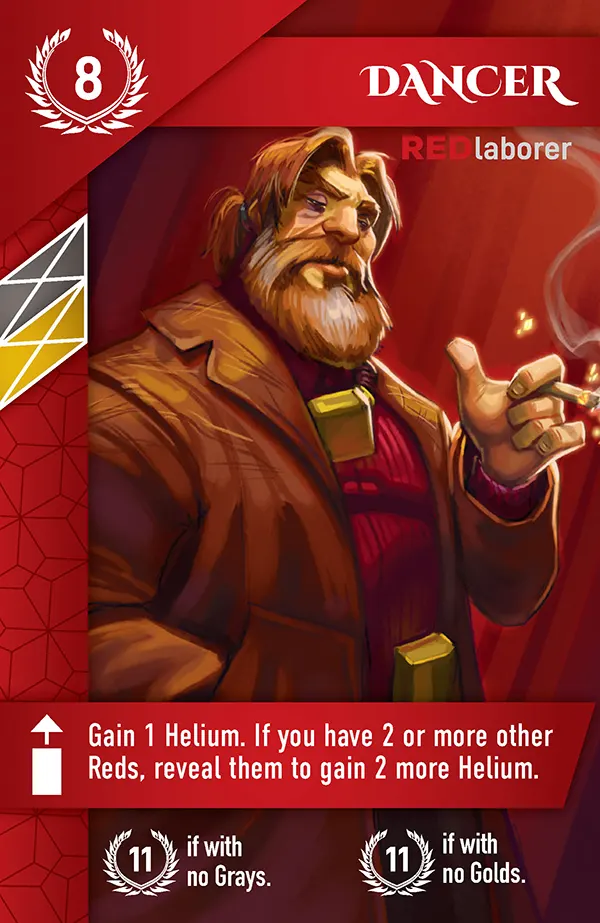
8 Dancer Red laborer
- Gain 1 Helium. If you have 2 or more other Reds, reveal them to gain 2 more Helium.
End of Game
- 11
- if with no Grays.
- 11
- if with no Golds.
10 Danto Gray security
- Move a Copper or White from any location to directly under this card. You may gain that card; if you do, end your turn.
End of Game
- You may treat this card as if it is any one other color (in addition to Gray).
- 5
- for each Copper & White on all locations.
10 Darrow Red laborer
- Gain any other non-Gold from this location. Banish Darrow unless you deployed him on a Gold.
End of Game
- 30
- if you have 7 or more cards (including Darrow).
9 Dataport Specialist Green programmer
- If deployed on Jupiter, reveal the top 2 cards of the deck and place them under this card in any order.
End of Game
- 26
- if with a Blue.
9 Deanna Red laborer
- Gain 1 Helium.
End of Game
- 26
- if with another Red.
9 Developer Green programmer
- You may gain any other card from this location. If you do, end your turn.
End of Game
- ?
- Gain the core value of the top card of any location.
16 Diplomat Copper bureaucrat
- You and an opponent of your choice may place 1 Influence on the Institute.
End of Game
- 19
- if you and any opponent have the exact same amount of Influence on the Institute.
9 Dr. Virany Yellow doctor
- If deployed on Mars, reveal the top 2 cards of the deck and place them under this card in any order.
End of Game
- You may gain any number of these banished cards: Victra, Sevro, Fitchner, and any Reds.
10 Eo Red laborer
- Each opponent must reveal a Red. If they can’t, they lose 1 Helium.
End of Game
- 10
- for each other Red.
- −10
- if with a Gray (except Bridge).
15 Evey Pink companion
- Banish Evey and all cards at this location. For each Gold banished, place 1 Influence token on the Institute (max 3).
End of Game
- 15
- if with Darrow.
- −15
- if with Mickey.
13 Firewall expert Green programmer
- Look at the top 3 cards of the deck. Place 1 of them face down at the top of each location. These cards are considered colorless while they are face down.
End of Game
- 22
- if there is at least 1 location with no cards or where the top card is face down.
25 Fitchner Gold elite
- If deployed to the Institute, place 1 Influence there.
End of Game
- 10
- if with a Red.
- 10
- if with Sevro.
16 Garden-trained Rose Pink companion
- Move the card directly under this one to the top of another location. If it’s a Silver, gain 1 Helium.
End of Game
- 14
- if with a Silver.
10 Gardener Brown assistant
- If deployed directly on top of a Violet or Pink, move that card to the top of another location and gain 1 Helium.
End of Game
- 5
- for each Violet & Pink.
16 Gravboot Cobbler Orange engineer
- You may gain a Gold or Gray from this location. If you do, end your turn.
End of Game
- You may treat this card as having the same name as any specific character.
- 14
- if with a Gold or Gray.
35 Group Counselor Yellow doctor
- Choose up to 3 banished cards and place each of them either on the top or bottom of the deck.
End of Game
- −1
- per banished card.
15 Hacker Green programmer
- Reveal the top card of the deck. Either banish it or place (not deploy) it to the top of another location.
End of Game
- Reveal the top card of the deck. Gain points equal to that card’s core value.
7 Harmony Red laborer
- An opponent of your choice loses 1 Helium.
End of Game
- 33
- if with only Reds, Pinks, Browns, and/or Obsidians.
14 Helga Obsidian assassin
- Banish the card directly under this one. If it was the only other card on this location, gain 1 Helium.
End of Game
- 16
- if with Pax au Telemanus or The Pax.
15 Holiday Gray security
- Move an Orange or Blue from any location to directly under this card. You may gain that card; if you do, end your turn.
End of Game
- You may treat this card as if it is any one other color (in addition to Gray).
- 5
- for each Orange & Blue on all locations.
7 Holo Designer Green programmer
- If deployed on Luna, reveal the top 2 cards of the deck and place them under this card in any order.
End of Game
- 28
- if with a Violet.
12 Holo Host Violet artist
- If you have more Influence on the Institute than the player to your right, give them the Holo Host, gain the top 2 cards of the deck, then end your turn.
End of Game
- 18
- if you have the most Influence on the Institute (or tied for the most).
15 Hypnotist Yellow doctor
- In clockwise order starting with you, each player selects a card from their hand, banishes it, and gains the top card of the deck.
End of Game
- Banish 1 other card from your hand and gain the top card of the deck.
15 Investor Silver financier
- Choose a color other than Silver. Gain 1 Helium for each card of that color at this location.
End of Game
- Choose a color other than Silver and gain 1 Helium for each card of that color on Mars.
19 Invictus Blue pilot
- If deployed on Mars, advance once on the Fleet Track.
End of Game
- 16
- if you are the most advanced on the Fleet Track (or tied for the most).
- −9
- if an opponent is more advanced on the Fleet Track.
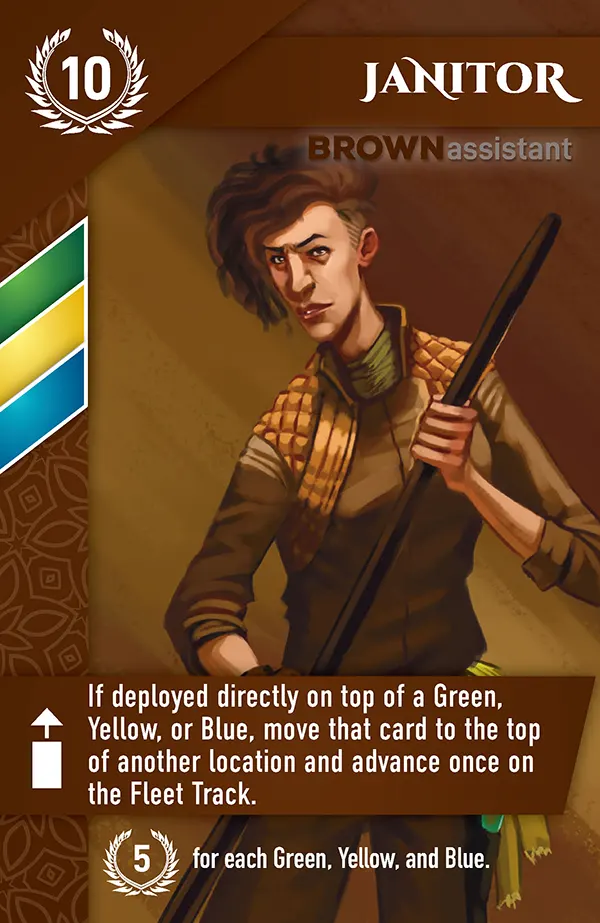
10 Janitor Brown assistant
- If deployed directly on top of a Green, Yellow, or Blue, move that card to the top of another location and advance once on the Fleet Track.
End of Game
- 5
- for each Green, Yellow, and Blue.
10 Jopho Obsidian assassin
- You may gain Alfrun or Nero from this location. If you do, regain Jopho and end your turn.
End of Game
- 10
- if with Alfrun.
- 10
- if with Nero.
10 Judge White arbitrator
- When an opponent tries to steal or banish any of your cards, reveal this to block them.
End of Game
- 3
- for each of your cards.
15 Justice White arbitrator
- You may reveal this whenever an opponent tries to take the Sovereign token from you. If you do, banish this card to keep the token, then gain the top card of the deck.
End of Game
- If you have the Sovereign token, gain 1 card of your choice from Luna.
15 Karnus Gold elite
- Banish the card directly under this one. If the banished card is Mustang, The Jackal, or Nero, you may also choose an opponent. If you do, they banish 1 of their cards.
End of Game
- 30
- if with Cassius.
- −15
- if with Mustang, The Jackal, or Nero.
13 Lawyer Copper bureaucrat
- Place 1 Influence on the Institute.
End of Game
- 12
- if with a White (not the Judge).
- 22
- if with the Judge.
13 Loan Shark Silver financier
- Choose an opponent. They may give you 2 Helium to immediately take 1 turn out of order (but may not gain Loan Shark) before you finish your turn. Otherwise they must give you 1 Helium.
End of Game
- 7
- if you have at least 7 cards.
20 Lorn Gold elite
- If the card directly under this one is a Gold, banish that card.
End of Game
- 15
- if with no other Golds.
10 Lysander Gold elite
- Gain the top card of the deck. Banish Lysander unless you deployed him on Luna.
End of Game
- 20
- if you have the Sovereign token, Octavia, or Cassius.
20 Magistrate White arbitrator
- If you have the Sovereign token, gain 1 Helium.
End of Game
- 15
- if you have at least 3 Helium, 3 Influence on the Institute, and at least level 3 on the Fleet Track.
15 Martyr White arbitrator
- If an opponent tries to take the Sovereign token from you, you may block them by revealing and banishing this card, then gain the top card of the deck.
End of Game
- If you have the Sovereign token, gain 1 card of your choice from Mars.
14 Masseuse Pink companion
- Move the top card of another location to the top of a different location. Gain the original location bonus for that card.
End of Game
- 16
- if with a Copper.
13 Matteo Pink companion
- Move any other card from this location to the top of another location. If it’s a Pink, place 1 Influence token on the Institute.
End of Game
- 17
- if with a Pink or Quicksilver.
10 Mess Hall Cook Brown assistant
- If deployed directly on top of a Gray or Orange, move that card to the top of another location and advance once on the Fleet Track.
End of Game
- 5
- for each Gray and Orange.
15 Mickey The Carver Violet artist
- You may banish a Red from your hand. If you do, reveal cards from the deck until you find a Gold. Gain it and place the revealed cards at the bottom of the deck in any order.
End of Game
- 10
- if there is at least 1 banished Red.
- 10
- if with a Gold.
10 Modjob Brown assistant
- If deployed directly on top of a Red or Brown, deploy that card to the top of another location.
End of Game
- 5
- for each Red and Brown (including Modjob).
35 Morning Star Blue pilot
- If deployed on Jupiter, advance once on the Fleet Track.
End of Game
- −15
- unless with Orion, Virga, or Pelus.
8 Musician Violet artist
- Move a card with an even core value from this location to the top of another location.
End of Game
- 32
- if the core value of each of your cards is an even number.
20 Mustang Gold elite
- Gain 1 banished card. If that card is not a Gold, banish Mustang.
End of Game
- 5
- for each different color.
10 Nanny Brown assistant
- If deployed directly on top of a Silver, White, or Copper, move that card to the top of another location and gain 1 Helium.
End of Game
- 5
- for each Silver, White, and Copper.
25 Nero Gold elite
- Gain 1 Helium for each Red at this location.
End of Game
- 10
- if you have the Sovereign token.
- −5
- each for Cassius, Karnus, and Octavia.
30 Octavia Gold elite
- If you have the Sovereign token, gain the bottom card on Luna (if it’s not this card); banish Octavia unless that card is a Gold.
End of Game
- −30
- if you don’t have either the Sovereign token or Lysander.
7 Online Gambler Green programmer
- Name 3 colors, then reveal the top card of the deck. If it matches a color you named, gain it and banish this card. Otherwise, banish the revealed card.
End of Game
- Name 1 non-Gold color. Reveal 7 cards from the top of the deck and gain all cards of that color. Shuffle and return the other cards to the top of the deck.
19 Orator White arbitrator
- If you have the Sovereign token, place 1 Influence on the Institute.
End of Game
- 21
- if you don’t have the Sovereign token.
18 Orion Blue pilot
- If this is deployed on Mars, Luna, or The Institute, deploy one other Blue from this location to Jupiter.
End of Game
- 10
- if with Pax au Telemanus or The Pax.
- ?
- Gain points equal to your position on the Fleet Track (0−10).
5 Pathologist Yellow doctor
- Banish the bottom card of this location (if it’s not this card).
End of Game
- 10
- if there are 5–9 banished cards at the beginning of end-game scoring.
- 25
- if there are at least 10 banished cards at the beginning of end-game scoring.
15 Pax au telemanus Gold elite
- When an opponent tries to steal or banish your cards, reveal this to block them.
End of Game
- 20
- if with an Obsidian or Mustang.
5 Pelus Blue pilot
- Advance twice on the Fleet Track, then all other players advance once on the Fleet Track.
End of Game
- 20
- if your Fleet Track position is 5–7.
- 35
- if your Fleet Track position is 8–10.
15 Politician Copper bureaucrat
- You may reveal 2 Golds from your hand. If you do, place 2 Influence on the Institute.
End of Game
- 15
- if you have the most Influence on the Institute (or tied for the most).
20 Priestess White arbitrator
- If you have the Sovereign token, advance once on the Fleet Track.
End of Game
- 20
- if with only cards having core values of at least 20 points.
20 Psychologist Yellow doctor
- You may place (not deploy) 1 or 2 banished cards on the top of one location.
End of Game
- If you have the fewest cards in hand (ties count). Gain 1 random banished card.
13 Pulse Armorer Orange engineer
- You may gain a Gray from this location. If you do, end your turn.
End of Game
- You may treat this card as having the same name as any specific character.
- 17
- if with a Gray.
12 Pulse Fistengineer Orange engineer
- You may gain an Obsidian from this location. If you do, end your turn.
End of Game
- You may treat this card as having the same name as any specific character.
- 18
- if with an Obsidian.
40 Quicksilver Silver financier
- Steal 1 Helium from the opponent with the most Helium (if tied, you choose which of those opponents).
End of Game
- −30
- if any opponent has more Helium than you.
14 Quietus Blue pilot
- If deployed on the Institute, advance once on the Fleet Track.
End of Game
- 16
- if you have the most Influence on the Institute (or tied for the most).
20 Ragnar Obsidian assassin
- Banish the top card of another location. If it’s a Gold or a Gray, place 1 Influence on the Institute.
End of Game
- 10
- if with an Orange.
- 10
- if with Sefi.
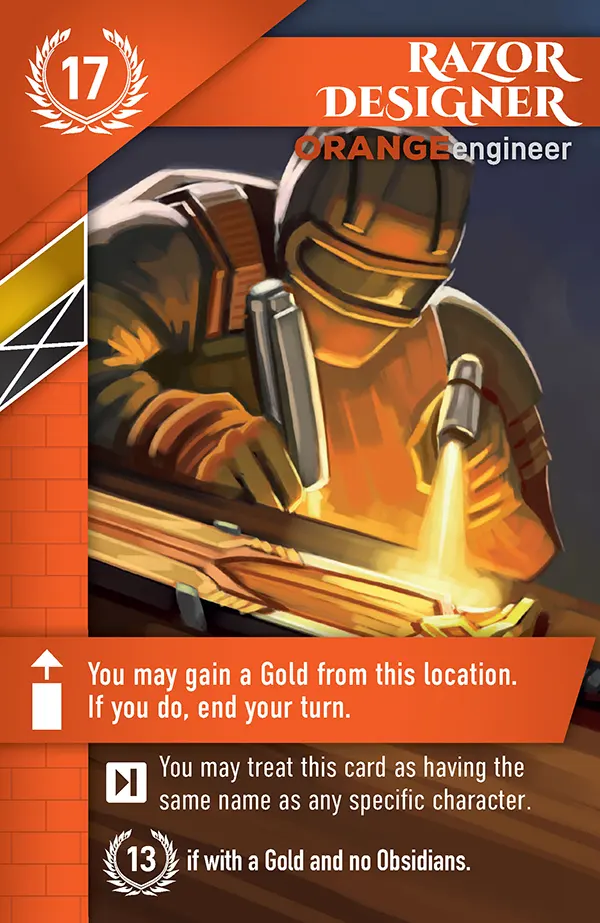
17 Razor Designer Orange engineer
- You may gain a Gold from this location. If you do, end your turn.
End of Game
- You may treat this card as having the same name as any specific character.
- 13
- if with a Gold and no Obsidians.
6 Reporter Violet artist
- If you have more Helium than the player to your right, give them the Reporter, gain the top 2 cards of the deck, then end your turn.
End of Game
- 29
- if you have the most Helium (or tied for the most).
13 Researcher Yellow doctor
- Place a random banished card at the bottom of this location.
End of Game
- 17
- if there are 4 or fewer banished cards at the beginning of end-game scoring.
25 Romulus Gold elite
- Gain 1 Blue from this location. Banish Romulus unless you deployed him directly on top of a Gold.
End of Game
- 15
- if you have the Sovereign Token.
- −25
- if with Roque or Octavia or without a Blue.
20 Roque Gold elite
- Look at an opponent’s hand, name a card, then randomly select a card from their hand. If you select the named card, banish it and banish Roque.
End of Game
- 5
- for each Blue.
19 Seer White arbitrator
- If you have the Sovereign token, reveal the top card of the deck and place (not deploy) it on another location.
End of Game
- 11
- if you have the Sovereign token.
20 Sefi Obsidian assassin
- Gain another Obsidian from this location.
End of Game
- 20
- if with Ragnar.
- −5
- for each Gold.
15 Sevro Gold elite
- Banish the card directly under this one. You may reveal The Howlers to instead gain that card.
End of Game
- 20
- if with Victra, The Howlers, or a Red.
20 Sponsor Silver financier
- You may pay 1 Helium to place 2 Influence on the Institute.
End of Game
- 2
- for each of your Influence tokens on the Institute.
15 Stained Obsidian assassin
- Banish any other card from this location. If it’s an Obsidian, place 1 Influence on the Institute.
End of Game
- 15
- if this is your only Obsidian.
10 Stock broker Silver financier
- You may lose 1 Influence from the Institute. If you do, gain 2 Helium.
End of Game
- 5
- for each Helium (max 25 points).
15 Sun-Hwa Gray security
- Move an Obsidian or Green from any location to directly under this card. You may gain that card; if you do, end your turn.
End of Game
- You may treat this card as if it is any one other color (in addition to Gray).
- 5
- for each Obsidian & Green on all locations.
0 Surgeon Yellow doctor
- You may banish a non-Gold from your hand and gain a banished Gold.
End of Game
- Gain any 1 banished Gold.
- 5
- for each Gold.
20 Tactus Gold elite
- You may steal 1 card from an opponent (they choose the card). If you do, banish Tactus and end your turn.
End of Game
- 20
- if with Octavia, Darrow, or a Pink.
20 The Howlers Gold elite
- When an opponent tries to steal or banish your cards, reveal this to block them.
End of Game
- 15
- if with Sevro.
10 The Jackal Gold elite
- Gain the Sovereign token.
End of Game
- 30
- if you have the Sovereign Token.
- −30
- if with Darrow or Octavia.
20 The Pax Blue pilot
- If deployed on Luna, advance once on the Fleet Track.
End of Game
- 15
- if with Darrow, Sevro, Orion, Virga, or Pelus.
20 The Telemanuses Gold elite
- Move all cards under this card from this location to the top of another location in the same order.
End of Game
- 15
- if with Pax au Telemanus or The Pax.
16 Theodora Pink companion
- You may move the bottom card of this location on top of this card. If it’s a Gold or Red, gain it, then end your turn.
End of Game
- 14
- if with a Gold or Red (but not both).
10 Timony Copper bureaucrat
- For each Gold at the Institute, place 1 influence token there.
End of Game
- 3
- for each of your Influence tokens on the Institute.
15 Trigg Gray security
- Move a Gray or Yellow from any location to under this card. You may gain that card; if you do, end your turn.
End of Game
- You may treat this card as if it is any one other color (in addition to Gray).
- 5
- for each Gray & Yellow on all locations.
20 Ugly Dan Gray security
- Move a Red or Brown from any location to under this card. You may gain that card; if you do, end your turn.
End of Game
- You may treat this card as if it is any one other color (in addition to Gray).
- 5
- for each Red & Brown on all locations.
10 Uncle Narol Red laborer
- Gain 2 Helium.
End of Game
- 40
- if with only cards having core values of 10 points or less.
20 Victra Gold elite
- Gain the bottom card of this location (if it’s not this card). Banish Victra unless you deployed her on a Gold.
End of Game
- 10
- if with The Howlers.
- 10
- if with Sevro or Darrow.
10 Virga Blue pilot
- Advance twice on the Fleet Track, then all other players advance once on the Fleet Track.
End of Game
- 15
- if your Fleet Track position is 6–8.
- 30
- if your Fleet Track position is 9 or 10.
7 Vlogger Violet artist
- If you’re further on the Fleet Track than the player to your right, give them the Vlogger, gain the top 2 cards of the deck, then end your turn.
End of Game
- 23
- if you are the furthest on the Fleet track (or tied for the furthest).
9 Zanzibar Violet artist
- Move a card with an odd core value from this location to the top of another location.
End of Game
- 31
- if the core value of each of your cards is an odd number.
Blues
Blues are the astronavigators and pilots of the Society, bred specifically to crew starships.
Browns
Browns work as servants in homes, businesses and social institutions; often seen as attendants, cooks, janitors, farmers or nannies.
Coppers
Coppers are the administrators, lawyers and bureaucrats of the Society. They hold positions of public affairs and administration.
Golds
Golds are the highest tier within the Society. They are fiercely intelligent, and are humanity's dominant caste.
Grays
Grays serve as the police, military and security personnel throughout the Society.
Greens
Greens are the programmers and developers of technology for the Society.
Obsidians
Obsidians are a tribal-like, “monstrous” race, only bred for war.
Oranges
Oranges are the mechanics of the Society and provide systems support upon starships and all manners of mechanical enterprises.
Pinks
Pinks are bred and trained for the physical arts of pleasure and sex.
Reds
Reds are the unskilled workers suited to brutal environments and menial service jobs.
Silvers
Silvers are the financiers and businessmen of the Society.
Violets
Violets are the creative class, the artists, musicians and performers of the Society.
Whites
Whites are the priests, priestesses and mentors that fulfill many of the religious, educational, and appraisal functions of the Society.
Yellows
Yellows are experts in medicines, human, and natural sciences. They are the doctors, psychologists and scientists of the Society.
Au Toma Components
- 22 Au Toma cards
- 4 Priority cards
- 1 double-sided Luna bonus card
- 1 double-sided odd/even and scoring card
- 2 double-sided Au Toma player aid cards
Au Toma Setup
Before doing any of the normal setup steps of a 2-player game:
Shuffle the 22 normal Au Toma cards to form the face down Au Toma deck and set the topmost 4 off to the side for later use.
-

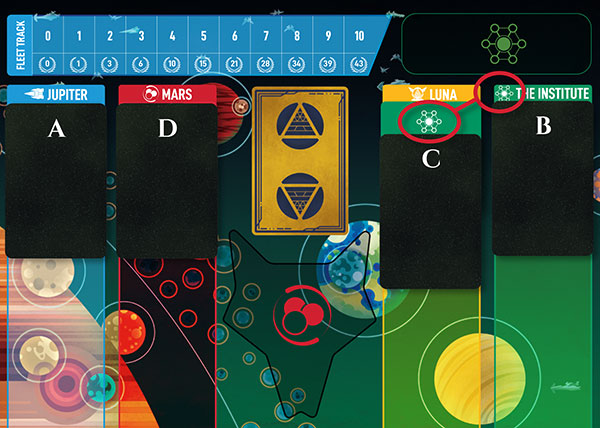
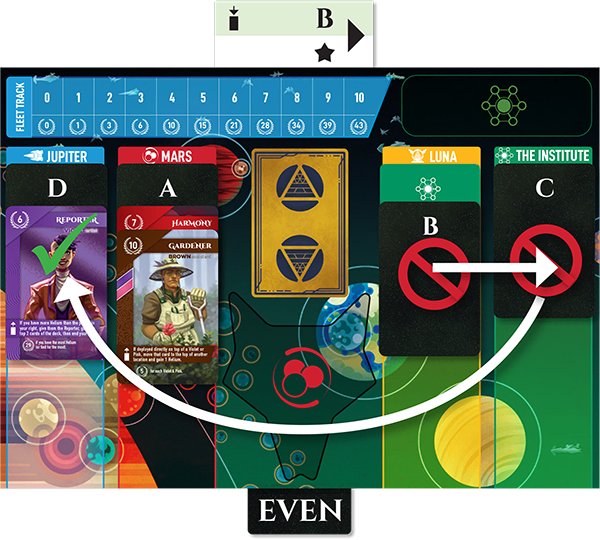
Shuffle the 4 priority cards and place 1 face up at the top of each location.
A is the highest priority and Au Toma will use that location most often, while D is the lowest priority, corresponding to the location she will use the least.
-
Tuck the Luna bonus card below the priority card at Luna so that only 1 of the card’s icons is visible.
If Luna has the A-priority card, then the visible icon should be the icon of the location that has the D-priority card and vice versa.
If Luna has the B-priority card, then the visible icon should be the icon of the location that has the C-priority card and vice versa.
-
Remove the following character cards from the game: Auctioneer (Copper), Eo (Red), Loan Shark (Silver), Psychologist (Yellow), and Roque (Gold) from the game.
Next setup the rest of the game as normal with these changes:
Au Toma starts with a hand (deck) of 2 character cards, as opposed to the normal 5, and she does not gain a house. The cards in her hand are face down.
 Take the odd/even card and tuck it partially below the bottom of the board so that either “ODD” or “EVEN” sticks out, corresponding to whether there are most cards with an odd or even core value on the board (in case of ties pick “EVEN”). That side stays face up for the rest of the game. Note that 0 is an even number.
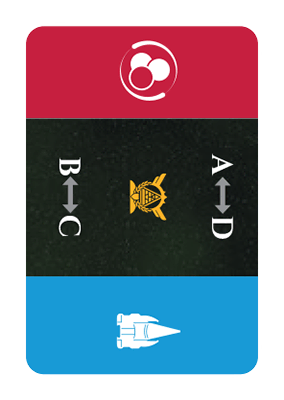
Au Toma Cards
- Deploy character section
- Gain character section
- Extras section
- Location selection
- Location tiebreaker
- Bonus Indicator
- Card ID
- Luna Bonus Card
- Odd/Even & Scoring Card
- Priority Card
Effects on Tull Au Toma from Abilities You Activate
When you activate a deploy ability that (potentially) lets you either steal a character card from Au Toma or force her to banish one, use the bottom card of her hand.
Whenever Au Toma adds a card to her hand, or returns one after revealing it, she places it face down on the top of her hand.
If you activate an ability that allows Au Toma to gain something for free, she always chooses to do so.
Revealing Cards to Au Toma
Some cards instruct you to reveal one or more cards. Normally, you must show the cards to the other players, but Au Toma does not care so when playing against her you must simply have the specified card(s) in your hand.
Au Toma Luna Bonus Card
When Au Toma gains the Luna bonus (even if she does not actually get the Sovereign token) she also gains the bonus of the location indicated on the Luna card.
Tull Au Toma Takes a Turn
Au Toma takes her turn in the turn order as a human player. Follow this procedure:
If there are no cards left in the Au Toma deck: Form a new one by shuffling all the Au Toma deck cards, including those set off to the side previously, and set the topmost 4 cards off to the side like during setup.
Draw the 2 topmost Au Toma cards one at a time and perform the procedure below for each card, in the order you drew them. Fully resolve the first card before resolving the second. This means that Au Toma does 2 Lead actions per turn instead of just 1 like you do, and she never Scouts.
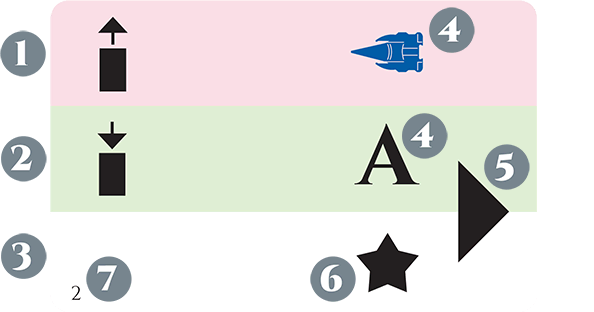
 Deploy character: Place the top card of the character deck (not her hand) on the location chosen by the Deploy section of the Au Toma card. She does not trigger the deploy ability.
Gain character: Au Toma gains the top card of the location chosen by the Gain section of the Au Toma card. Place it face-down on the top of her hand.
Extras: If there is an icon in the extras section do this depending on the icon:
Au Toma gains the bonus of the location from which she gained a card.
Banish the top card of the character deck.
Discard the 2 Au Toma cards (you are allowed to look through her discarded cards at any time.)
Tull Au Toma Selects a Location
When Au Toma is to select a location for deployment or gaining a character, use the deploy or gain section of the current Au Toma card as applicable and follow this procedure:
If the section has a location icon, Au Toma selects that location.
If the section instead has a letter, she chooses the location that has the priority card with that letter.
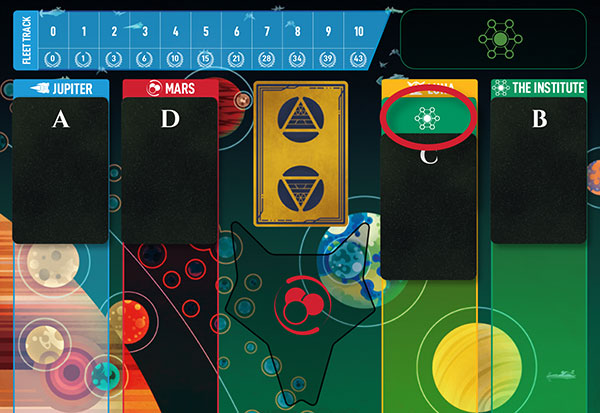
Empty locations can never be valid when gaining a character, so if Au Toma selects one do this:
Look at the arrow icon and start at the location she selected.
Move in the direction of the arrow until the first valid location is found. She selects that location instead. Wrap around from The Institute to Jupiter or vice versa as needed.
If she in any way would gain a bonus of which she already has 10 (10 Helium, position 10 on the Fleet track, or 10 Influence) she instead gains the bonus of another location (this does not change which card she gains).
Use the tiebreaker arrow as in step 3 until she reaches a location with a bonus of which she does not already have 10.
In case she gains the bonus via the Luna bonus card, she will still gain the Sovereign token in addition to the substitute bonus.
Au Toma Scoring
On normal difficulty (level 2), Au Toma gains points in the following way:
She has a base score of 70 points. Add points to that in the steps below.
Points for Fleet Track, Helium tokens, the Sovereign token, and Influence as a human player.
Instead of scoring her hand like normal she gains the following:
Cards in her hand are matching if their core value is odd/even matching the visible word on the odd/even card placed during setup. Note that 0 is even.
Otherwise, they are nonmatching.
Sort her cards into matching and nonmatching.
Reduce Au Toma’s hand to 20 cards. Discard non-matching cards first, then matching till she has 20 left. Skip this step if she has 20 or fewer cards.
She gains 6 points per matching card and 3 points per nonmatching. Other difficulty levels change these numbers.

Au Toma Variant
This optional variant provides rules that handle your deployment of 4 of the 5 cards that are otherwise removed from the game, so that they can be included.
Auctioneer (Copper): Roll the Rising Die until you roll a bonus which Au Toma can get (e.g., not the Fleet Track if she’s already at position 10). She chooses that bonus.
Eo (Red): Look at the 6 topmost cards of her hand or all of them if she has fewer. Check for a Red then put the cards back down in the same order.
Psychologist (Yellow): For this comparison Au Toma has the number of cards in her hand divided by 3, rounded down.
- This number is calculated before reducing her hand to 20 cards (see Scoring).
Roque (Gold): Look at the 6 topmost cards of her hand or all of them if she has fewer. When you are done, shuffle and return them to the top of her hand.
Au Toma Difficulty levels
You can choose the difficulty level you prefer from this table (1 is easiest, 6 is hardest):
| Level | Tull Au Toma | Matching | Nonmatching |
|---|---|---|---|
| 1 | High Red | 5 | 2 |
| 2 | Stained (Normal) | 6 | 3 |
| 3 | Lurcher | 8 | 4 |
| 4 | Master Maker | 10 | 5 |
| 5 | Carver | 12 | 6 |
| 6 | Peerless Scarred | 14 | 7 |